skip to main |
skip to sidebar
Hi all - let's pick it up where we left off in last post. This will see us through to the finish of a very meaningful piece for me to make.
A precious fragment of Early 19th-century map is attached to the back of the opaque glass, to be viewed through the fabricated binoculars lens I made.
The "jewel" to occupy the center space through the lens is this fantastic multicolored beetle specimen, from a collector in the Northern Territories of Australia circa 1975.
Testing it out under the lens, it becomes a beautiful focal point to this side of the piece. Here the bronze resin assembly has been patinated dark and as yet has not been polished to bring the metal out in the surface.
Pearls are mounted in the holes at the top and bottom and the assembly is attached to the body of the compact.
All is left to set and dry, so I have a few days to put my thoughts elsewhere.
I now turn back to the original clear resin panel I made right at the beginning of this project, with Maureen's baby hair embedded in it. I had fused two pieces of glass with her image, and turn to the second unused image in order to make what I think will be a companion to the neckpiece.
Cutting away the glass I don't need with my ring saw.
After beveling and shaping, it's ready to go.
I settle on this very large diameter antique pie plate as the body of what I'm sure now will be a brooch.
Getting out my aggressions with the rawhide mallet.
A chamber now lies in waiting for my fused glass photo.
A pin back is riveted in place.
In an odd lapse of routine, this is the last in-progress photo of this brooch being made... It can be seen completed via the link at the end of the post. Apologies!
Back to REFLECTIONS.
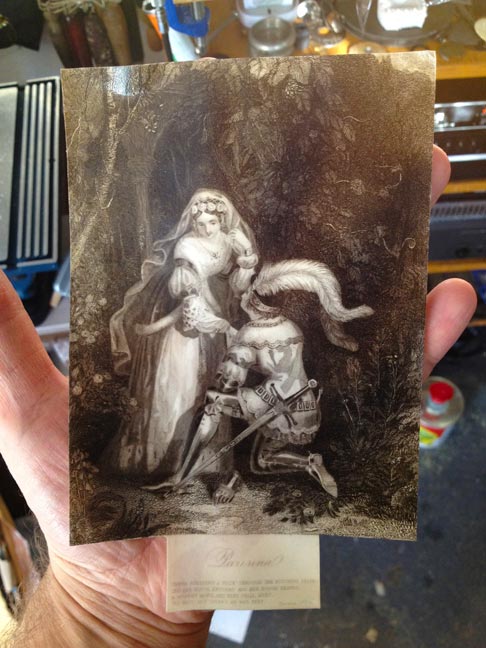
A stunning early steel engraving is chosen to occupy the niche I ground in the clay pipe.
It was glued into a mid-19th century scrapbook - so here it is being soaked off the large page.
Separated and ready to remove the part I need.
Her face is mounted to the back, and a "lens" of resin gives her face a dreamy detachment.
Turning to signing the artwork, I prepare to etch my name and date in a small recess at the bottom of the neckpiece.
Carefully inscribing my name.
...and ready to be etched.
The pendant and chain complete, I rivet the leather cord into an antique key, which has been modified to become the clasp of the neckpiece. At long last, after many weeks of work, it's complete.
Postscript: a few weeks after the piece was finished, in early May, it was presented to Maureen's daughter Felicity. I was lucky enough to be able to photograph her wearing both neckpiece and brooch - mother and daughter reflecting each others beauty. It was a totally moving experience. The modeled photos can be seen after the detail images of the finished objects at the links below.
*******
REFLECTIONS.
and
THE LAND OF DREAMS.
*******
Thank you so much for looking!
Keith
Welcome back! Early on in the making of the shoe piece, I created a braided cord to use as the necklace. Let's see that now, as it will come back into play as the visual of the whole thing falls into place...
I start with a Celtic money ring from around the 3rd to 1st century BC. The off-white thread I'm using here is some spectacular antique rayon, yellowed with age.
I've made this kumihimo plate designed after Makiko Tada's original plate design.
The flat braid appears. It's a zig-zag anda-gumi pattern.
And finished with another money ring. The discoloration of this old cord makes this my favorite braid I've made yet. If anyone out there has decrepit old discolored thread or cord that they want to donate to my obsessive new practice, please get in touch and I'll cover the shipping!
Now back to the pendant. Now that the sole work is in place, I can focus on what will nestle behind the glass, both the upper lens and the lower fused glass. Starting with the fused glass at the toe end, I take a eucalyptus seed cap and search out an engraving to occupy it.
A fantastic Australian scrapbook from the 1870's. Lucky this was unbound and decaying...
When she's mounted behind the glass, it should read as a sort of thought-bubble over the woman's portrait...
...like so.
Now for the top lens. Taking note of all the fabrics and textiles working their way into the piece, it occurs to me to include some antique lace or doily work into the background of the lens chamber. But as soon as my eyes fall on this small bit of tatting, I know this is to be used as a grille through which I will view another face. The center circle is even the same diameter as my lens!
I couldn't have fabricated a better fit...
A portrait of Gabriel Dumont will peer from the stitching.
I now set about searching for a title, through my collection of about 5000 accumulated titles from antique books, newspapers, etc. I've learned to be patient through this process, and not to force any associations in advance, but to go with my gut when it appears.
After exhausting my title file, I begin thumbing through complete books in my collection, hoping to find a connection there.
And there she is. No wonder she was so hard to see! The piece jumps vividly to life in my mind now - amazing how the trail of clues leads me to this life I've assembled.
Now to design a plate with the title to integrate into the form.
Space allowed to pass under the green kumihimo braid.
Cutting the plate.
Type written on and ready to etch.
Just out of the etchant.
Forming the plate on the work.
Sitting aside waiting its turn to climb aboard.
Now I treat the little boot with a high-end saddle dressing - this thirsty leather hasn't seen nourishment for over a century. New, rich color is brought up out of the leather.
I sit the plate in position and start mulling how to lash it down.
Thanks for staying with me. In the final installment: the boot gets laced, the back gets some serious attention, an unusual clasp is devised and it's a wrap.
Hoped you enjoyed yourself.
Keith
I'm deep in the journey of making a sculptural object, and I'd like to get it up here for all of you.
About a year ago I was invited to donate a piece made from a very specific piece of trash: an old hubcap. My old friend Boris Bally had put them on to me. The organization, Landfillart.org, was sending artists re-chromed trashed hubcaps to turn into art and send back. The resulting exhibition and publication would raise awareness about recycling (not that recycling needs much more awareness nowadays, but a great cause nevertheless).
My stipulation was two-fold: that the hubcap be from as old a car as possible, and that it not be re-chromed. Ken Marquis, the orchestrator of this project (now grown to a whopping 1,041 artists worldwide!) personally sent me his oldest hubcap. What a beauty.
I'm off and running...
The old V8 hubcap - I'm guessing about 1939?
What a logo. The deepness of the bowl allows me to make an interior environment. I don't want to lose the logo, so that'll have to be part of the design.
Luckily my brother is a big-time master electrician on Broadway - I've been saving these follow-spot lenses he gave me for about 20 years, using them as the opportunity presents. Thanks, Mike!
Look at this fit. The dome is even the same curvature as the lens. Time to get cutting.
I've designed the shape to be cut away. This'll be tough work, as I'm dealing not only with two pieces (the silver decorative cap and the underlying heavy steel hubcap), but both these pieces are curved. I've also decided to flip the orientation of the piece, so the logo will essentially read as an "A".
Ready to cut.
The outer cap is fairly straight-forward.
The main cap - is not. No saws are up to it, so it has to be ground away.
Back indoors after the grinding.
After choosing a title, I set about etching it into heavy brass and designing it to arch over the opening I've cut in the cap.
Sawing it out.
The tabs that were cut on the bottom are bent around to create 'eyes' through which a heavy wire will run. Only the center tab remains straight, to go through the hubcap itself.
Ready to mount.
Wired into place. Notice the tabs I'd left on the silver cap are now curled back to hold more wire around the circumference of the lens.
Three of these wires will pierce the hubcap and lock the lens in place.
Next week: The interior assembly comes together, centerpieced with another of my new large fused-glass images.
Ciao!
Keith




 Posts
Posts


