Showing posts with label glass fusing. Show all posts

Monday, June 4, 2012

Reflections, In-Progress - Part Three.

Hi all - let's pick it up where we left off in last post. This will see us through to the finish of a very meaningful piece for me to make.


 A precious fragment of Early 19th-century map is attached to the back of the opaque glass, to be viewed through the fabricated binoculars lens I made.

 The "jewel" to occupy the center space through the lens is this fantastic multicolored beetle specimen, from a collector in the Northern Territories of Australia circa 1975.


 Testing it out under the lens, it becomes a beautiful focal point to this side of the piece. Here the bronze resin assembly has been patinated dark and as yet has not been polished to bring the metal out in the surface.

Pearls are mounted in the holes at the top and bottom and the assembly is attached to the body of the compact. 

All is left to set and dry, so I have a few days to put my thoughts elsewhere. 


I now turn back to the original clear resin panel I made right at the beginning of this project, with Maureen's baby hair embedded in it. I had fused two pieces of glass with her image, and turn to the second unused image in order to make what I think will be a companion to the neckpiece. 

Cutting away the glass I don't need with my ring saw. 

After beveling and shaping, it's ready to go. 


I settle on this very large diameter antique pie plate as the body of what I'm sure now will be a brooch.

Getting out my aggressions with the rawhide mallet.

A chamber now lies in waiting for my fused glass photo. 

A pin back is riveted in place.


In an odd lapse of routine, this is the last in-progress photo of this brooch being made... It can be seen completed via the link at the end of the post. Apologies!


Back to REFLECTIONS.


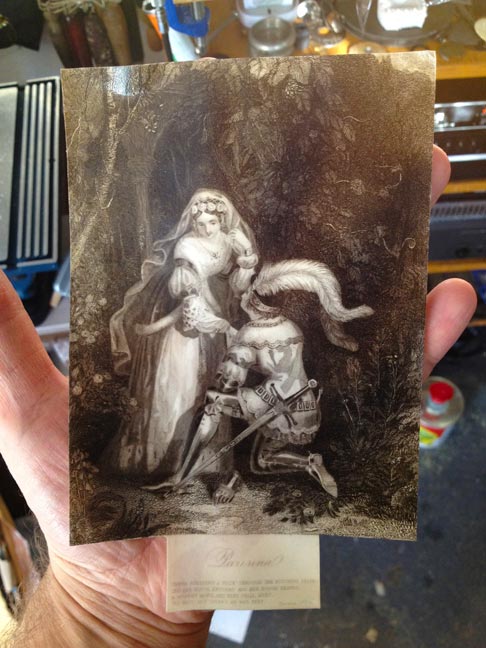
 A stunning early steel engraving is chosen to occupy the niche I ground in the clay pipe.

 It was glued into a mid-19th century scrapbook - so here it is being soaked off the large page.

 Separated and ready to remove the part I need.

 Her face is mounted to the back, and a "lens" of resin gives her face a dreamy detachment.

 Turning to signing the artwork, I prepare to etch my name and date in a small recess at the bottom of the neckpiece.

 Carefully inscribing my name.

 ...and ready to be etched.

The pendant and chain complete, I rivet the leather cord into an antique key, which has been modified to become the clasp of the neckpiece. At long last, after many weeks of work, it's complete. 


Postscript: a few weeks after the piece was finished, in early May, it was presented to Maureen's daughter Felicity. I was lucky enough to be able to photograph her wearing both neckpiece and brooch - mother and daughter reflecting each others beauty.  It was a totally moving experience. The modeled photos can be seen after the detail images of the finished objects at the links below.


*******


REFLECTIONS.


and


THE LAND OF DREAMS.


*******


Thank you so much for looking!


Keith


Thursday, July 7, 2011

To the Invisible Girl, in-progress - Part Three.

Welcome back! Early on in the making of the shoe piece, I created a braided cord to use as the necklace. Let's see that now, as it will come back into play as the visual of the whole thing falls into place...

 I start with a Celtic money ring from around the 3rd to 1st century BC. The off-white thread I'm using here is some spectacular antique rayon, yellowed with age.

 I've made this kumihimo plate designed after Makiko Tada's original plate design.


The flat braid appears. It's a zig-zag anda-gumi pattern.


 And finished with another money ring. The discoloration of this old cord makes this my favorite braid I've made yet. If anyone out there has decrepit old discolored thread or cord that they want to donate to my obsessive new practice, please get in touch and I'll cover the shipping! 


Now back to the pendant. Now that the sole work is in place, I can focus on what will nestle behind the glass, both the upper lens and the lower fused glass. Starting with the fused glass at the toe end, I take a eucalyptus seed cap and search out an engraving to occupy it.


A fantastic Australian scrapbook from the 1870's. Lucky this was unbound and decaying...


 When she's mounted behind the glass, it should read as a sort of thought-bubble over the woman's portrait...


...like so.

 Now for the top lens. Taking note of all the fabrics and textiles working their way into the piece, it occurs to me to include some antique lace or doily work into the background of the lens chamber. But as soon as my eyes fall on this small bit of tatting, I know this is to be used as a grille through which I will view another face. The center circle is even the same diameter as my lens!
 
 I couldn't have fabricated a better fit...

 A portrait of Gabriel Dumont will peer from the stitching.


 I now set about searching for a title, through my collection of about 5000 accumulated titles from antique books, newspapers, etc. I've learned to be patient through this process, and not to force any associations in advance, but to go with my gut when it appears.


 After exhausting my title file, I begin thumbing through complete books in my collection, hoping to find a connection there.

And there she is. No wonder she was so hard to see! The piece jumps vividly to life in my mind now - amazing how the trail of clues leads me to this life I've assembled.

Now to design a plate with the title to integrate into the form.

Space allowed to pass under the green kumihimo braid.

Cutting the plate.

 Type written on and ready to etch.

 Just out of the etchant.

 Forming the plate on the work.
 
 Sitting aside waiting its turn to climb aboard.

 Now I treat the little boot with a high-end saddle dressing - this thirsty leather hasn't seen nourishment for over a century. New, rich color is brought up out of the leather.

 I sit the plate in position and start mulling how to lash it down.

Thanks for staying with me. In the final installment: the boot gets laced, the back gets some serious attention, an unusual clasp is devised and it's a wrap.

Hoped you enjoyed yourself.

Keith

Tuesday, September 14, 2010

For Those Who Doubt, In Progress - Stage 2, completion.

This is a long one, but I want to get all the way though this time. Grab a cuppa, and join me.

Picking up from my last post, I created a round glass panel with a curious and beautiful wet-plate collodion negative image - here is the original image:


I absolutely love the photographer's markings on it - having scratched out the inferior exposure, he or she inadvertently lent a power and mystery to an otherwise straight-forward image. After scanning, the image is stretched vertically to allow the composition to adapt to a round format, as well as to tweak it one more step out of a documentary image.


After firing the image to an old piece of window glass, I'm preparing here to drill holes around the perimeter - slightly queasy work, as one wrong move and I'll need two more days to re-make the piece.


Waxed linen thread is tied to the glass now, and will be the material that suspends the panel inside the hubcap.


Ready and waiting.


I'm laughing as I post this - those who know me know I'll go to ridiculous lengths NOT to glue anything. But the occasion does arise! The glue around the lens here will serve a dual-purpose. First, it will seal the front gap between lens and hubcap. Second, and more importantly, I am building a 'moat' so I can pour resin onto the back of the lens and create a tableau between the lens and the fused glass image. The heavy brass wire was carefully pressed into place around the lens, but great care was taken not to add pressure or the lens would chip or crack. The sealant here creates a soft back-up to the wire.


One of those unforgettable gifts comes into play here. I was given this litter of tiny mummified mice by a kind soul during my last tenure in January at the McGregor Summer School in Queensland. She found them in her attic and collected them, though she wasn't sure what for. When she saw me giving my slide lecture, she knew why.  I decide to take three of these tiny creatures and encase them in the matrix of resin.


 First I give them a new set of eyes: African blue sapphires.


Preparing them for a resin nesting.


Making sure everything's on the level.


Beginning the pour.


The first of four pourings finished. The glue moat around the perimeter is built up each time, to keep above the rising resin. It'll have to be deep enough to completely immerse the three figures.


Next, a line of tiny bones arcs up the center behind the V8 logo. Most of these will be invisible unless the viewer sees the piece from a very oblique angle.


Setting the resin. This image blows up quite large if you click on it.


Before the final pour.


Small cicada wings will be nestled onto the mice, giving their floating presence around the lens some context.


For a moment, I can view the mice backlit by the sun, before the layers are put in place. Note the face in negative on the right.


Preparing to attach the glass panel.


And attached. The thread, stretched taut, suspends away from the front assembly.


A cutaway on the back for hanging.


Cutting a back from plywood.


A host of tubes, soon to be riveted into place in each hole of the board.


Though the image is out of focus here, you get the message. Often, because I'm photographing as I go, if I miss the shot, there's no second chance.


Taking up the rear-most area of the hubcap will be this beautiful brass gate ornament that I've fused glass, brass swarf (look it up!) and a Frozen Charlotte figure into. She'll be facing away from the viewer.


Marking the board for attachment.


The attachment holes drilled and riveted. The tube rivets give great structural strength to the plywood panel.


Steel wire feeding through.


Tyin' one on. 


In place and ready to attach to the assembly for its completion.


Fitting the wires to twist them together - quite an awkward procedure.


Do the twist.


At long last - my first glimpse of the assembly through the lens - a good moment. The thick convex lens really offers some surprising and wonderful distortions of the objects behind - if you hadn't seen the elements as you have here, you'd never know exactly what you were looking at. I love that stubbornness to give up secrets.


Signing the back.


Ready to take beauty shots.

Which are HERE.

Thanks for taking the journey with me!
Keith