skip to main |
skip to sidebar
Ricë over at the Voodoo Cafe has interviewed me about life and creativity, with a special focus on the piece just finished here on Stuffsmith, "REFLECTIONS."
You can find the podcast here.
Enjoy!
Keith
Hi all - let's pick it up where we left off in last post. This will see us through to the finish of a very meaningful piece for me to make.
A precious fragment of Early 19th-century map is attached to the back of the opaque glass, to be viewed through the fabricated binoculars lens I made.
The "jewel" to occupy the center space through the lens is this fantastic multicolored beetle specimen, from a collector in the Northern Territories of Australia circa 1975.
Testing it out under the lens, it becomes a beautiful focal point to this side of the piece. Here the bronze resin assembly has been patinated dark and as yet has not been polished to bring the metal out in the surface.
Pearls are mounted in the holes at the top and bottom and the assembly is attached to the body of the compact.
All is left to set and dry, so I have a few days to put my thoughts elsewhere.
I now turn back to the original clear resin panel I made right at the beginning of this project, with Maureen's baby hair embedded in it. I had fused two pieces of glass with her image, and turn to the second unused image in order to make what I think will be a companion to the neckpiece.
Cutting away the glass I don't need with my ring saw.
After beveling and shaping, it's ready to go.
I settle on this very large diameter antique pie plate as the body of what I'm sure now will be a brooch.
Getting out my aggressions with the rawhide mallet.
A chamber now lies in waiting for my fused glass photo.
A pin back is riveted in place.
In an odd lapse of routine, this is the last in-progress photo of this brooch being made... It can be seen completed via the link at the end of the post. Apologies!
Back to REFLECTIONS.
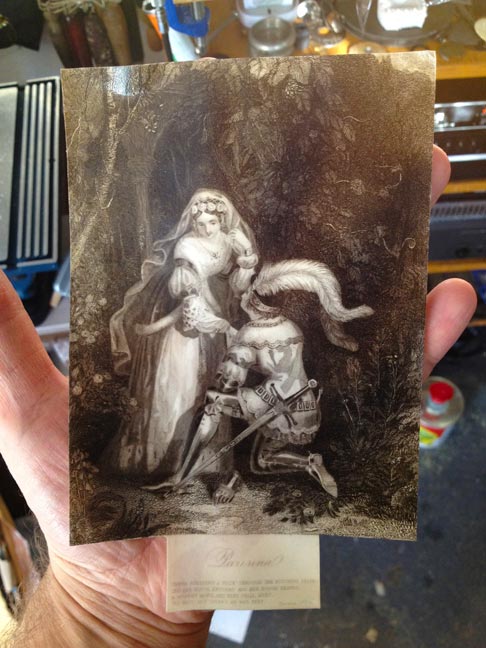
A stunning early steel engraving is chosen to occupy the niche I ground in the clay pipe.
It was glued into a mid-19th century scrapbook - so here it is being soaked off the large page.
Separated and ready to remove the part I need.
Her face is mounted to the back, and a "lens" of resin gives her face a dreamy detachment.
Turning to signing the artwork, I prepare to etch my name and date in a small recess at the bottom of the neckpiece.
Carefully inscribing my name.
...and ready to be etched.
The pendant and chain complete, I rivet the leather cord into an antique key, which has been modified to become the clasp of the neckpiece. At long last, after many weeks of work, it's complete.
Postscript: a few weeks after the piece was finished, in early May, it was presented to Maureen's daughter Felicity. I was lucky enough to be able to photograph her wearing both neckpiece and brooch - mother and daughter reflecting each others beauty. It was a totally moving experience. The modeled photos can be seen after the detail images of the finished objects at the links below.
*******
REFLECTIONS.
and
THE LAND OF DREAMS.
*******
Thank you so much for looking!
Keith
Welcome back. On to part two of our journey.
Now that I've finished the lens assembly that would occupy one side of the piece, attention turns now to creating points of connection for a cord or chain. I bypass my first thought (the easy solution!) of wrapping wire around the 'handle' part of the compact and decide instead to drill and tube-rivet anchor points in the hollow body of the compact itself.
The tubes inserted, yet to be flared out.
The tube-rivets finished. I like the placement.
The piece is patinated at this point to bring it all together thus far.
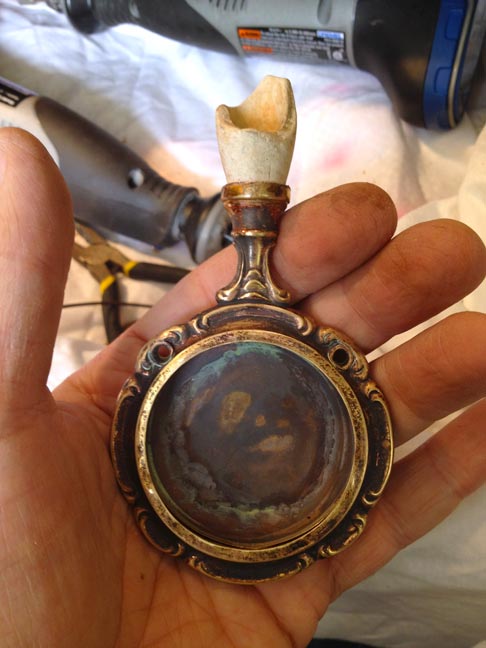
A fast hunch leads to this rather drastic move. I do like the lipstick mechanism, no doubt, but it nags me and I can see far more lyrical things up there, so off it's cut.
Several hours of fossicking through Studio Stuffsmith yields this gem: a 19th-century clay pipe bowl fragment from the Thames. It's a perfect crown.
The tall side, opposite the opening, is hollowed for an image.
As the clay is porous and fragile, its soaked in acrylic media to seal and strengthen it.
Yep. This step has kicked the piece to life for me. Wired solidly in place.
Now my focus turns to the covered chamber that will be the beating heart of the piece. I can now take stock of the elements I've readied for this side of the neckpiece. On the left, the opaque glass portrait of Maureen Kistle and on the right, the same portrait fused onto clear antique glass.
This clear image reads as a negative...
...until it is backed in black, when it becomes readable.
The pattern on the hinged lid is lovely and I want it to remain - however I want to have the empty circle in the center have some focal weight, so the radial pattern pulls the eye inward. I choose to create a bezel in which to mount a ruby. First a hole is drilled.
Now the surface is protected...
...and raised in a dapping block.
A washer of thin brass seals in the back of the stone. The opaque glass portrait can be seen faintly through the bottom panel. That is the area where the resin lens assembly will go (chronicled in last posting).
Now precious cargo comes aboard - a lock of Maureen's baby hair.
Laid in over black velvet, it will then be pinioned in place by the clear glass portrait. Note the small hole in the center of the velvet to allow light through the ruby.
The portraits now affixed in place and a chain of steel and brass attached.
At this stage I tiptoe through the titles and settle on the name of the piece. Obvious reference to both noun and verb, literal and ruminative. REFLECTIONS it is.
Next week, the final installment as the finished work (and a sister piece!) coalesces. I hope you'll join me!
Keith
A few times a year I find myself immersed in commissioned work. Some of these commissions involve some precious object of the client's to be used in a piece of wearable artwork.
A friend I've known for several years had been talking with me for much of that time about commissioning me to produce a piece in remembrance of her mother, who passed away over a decade ago. At the beginning of this year, it came to fruition and I began putting my mind to it. How very special to be making a piece for a friend, to be entrusted with precious keepsakes to creatively employ.
Felicity's mother, Maureen Kistle, had been Miss Australia in 1955. I was supplied with some of Maureen's baby hair, a small clover charm that she frequently wore and a phenomenal portrait of her, likely from her Miss Australia days. This was my generative image, ripe with possibility.
This is also the first chance to employ my newly-learned resin and moldmaking skills (this piece formed alongside the oyster piece seen previously).
So I begin by creating a patterned 'lens' that would cover the front of whatever I'd create. Into this clear matrix I embed some of the baby hair and two small rubies.
The resin disc complete.
Now I begin the search for a suitable structure for the piece. This is often the way things will run for me - I will create something intuitively, not having a context for it to live yet. As I'm about to discover, this element will sit this piece out.
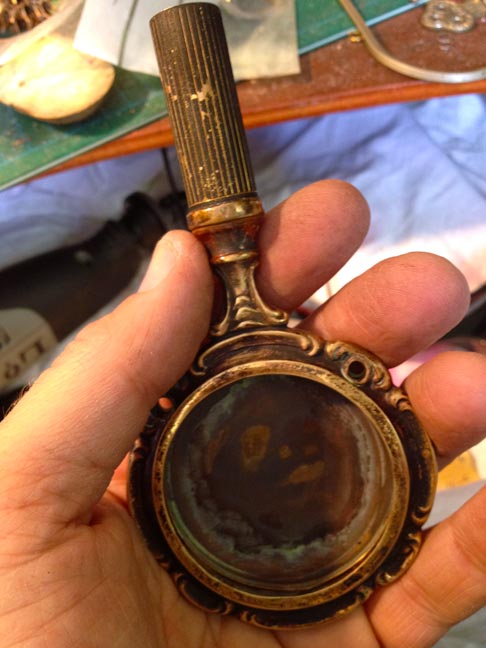
I had just bought this lovely 1950's compact case while teaching in Queensland - it quickly becomes the vehicle to work with. It immediately is apparent that I can't use the resin window I'd just made - the diameter is too large for the compact - so it is laid aside; I have intentions to use it on something else for Felicity; maybe a brooch? The rubies, and more importantly the hair, make this an element crucial not to merely toss aside. I'll come back to that later.
I study the compact. There are two mirrored surfaces. The powder compartment opens on this side ...
...and the other side has a beveled mirror, so the whole piece behaves like a miniature hand mirror.
The handle of the compact houses a lipstick, which is removed by nudging the little tab upward.
The original lipstick is still inside.
It's rank and rancid. Needs to go.
Gooey and stinky work. Not my favorite part of the day.
During this time, I've been at my kiln, firing Maureen's image onto opaque ivory-colored glass, in the diameter I need to insert in the compact. I've got an extra in case of any problems (this second image will come in handy, as we'll see).
Cutting the glass to size.
I begin removing the mirror backing from one of the mirrors, then decide not to use that glass in this piece.
It'll get used in something else, no doubt.
Next step is to burn off the compact's coating that has kept the metal from tarnishing all these years.
I can examine it now that is has cooled. The big decision I make at this stage is to have the piece be truly double-sided - able to be worn either way. The side opposite the hinged lid previously held a mirror facing out. I will create a lens fitting to seal the open side.
I find a doorknob escutcheon plate, just the right diameter, which I will cast. This will enable me to use a copy of the plate - the original is quite heavy, and would max the weight out at this early stage.
The plate as I find it.
The center ring is removed.
Ready to pour the mold.
The mold ready to make a casting.
The next piece to cast is this turn-of-the-20th-century gutta-percha binocular lens hood, which I do. LOVE the texture on this object.
Lastly, I create several lenses, one of which will be incorporated into the assembly.
Six molds a-making...
Right out of the mold - the center has been drilled so I can remove the interior with the jewelers saw. The resin is heavily loaded with bronze powder - it will respond to a polish just like a piece of metal.
The three elements - escutcheon, binocular hood, lens - assembled, polished - and ready to use.
Time to work on modifying the compact. Check back next week...
Keith








 Posts
Posts


