skip to main |
skip to sidebar
Last time we sat down together I was ready to create a wooden body for the inside of the fork's 'bowl.'
Getting roughed out.
A large hole is marked and two points where I will recess the wood so the fork will 'set' some dichroic glass beads I'd like to use.
After that is prepped, I mark out where I'll be able to peek through the fork tines.
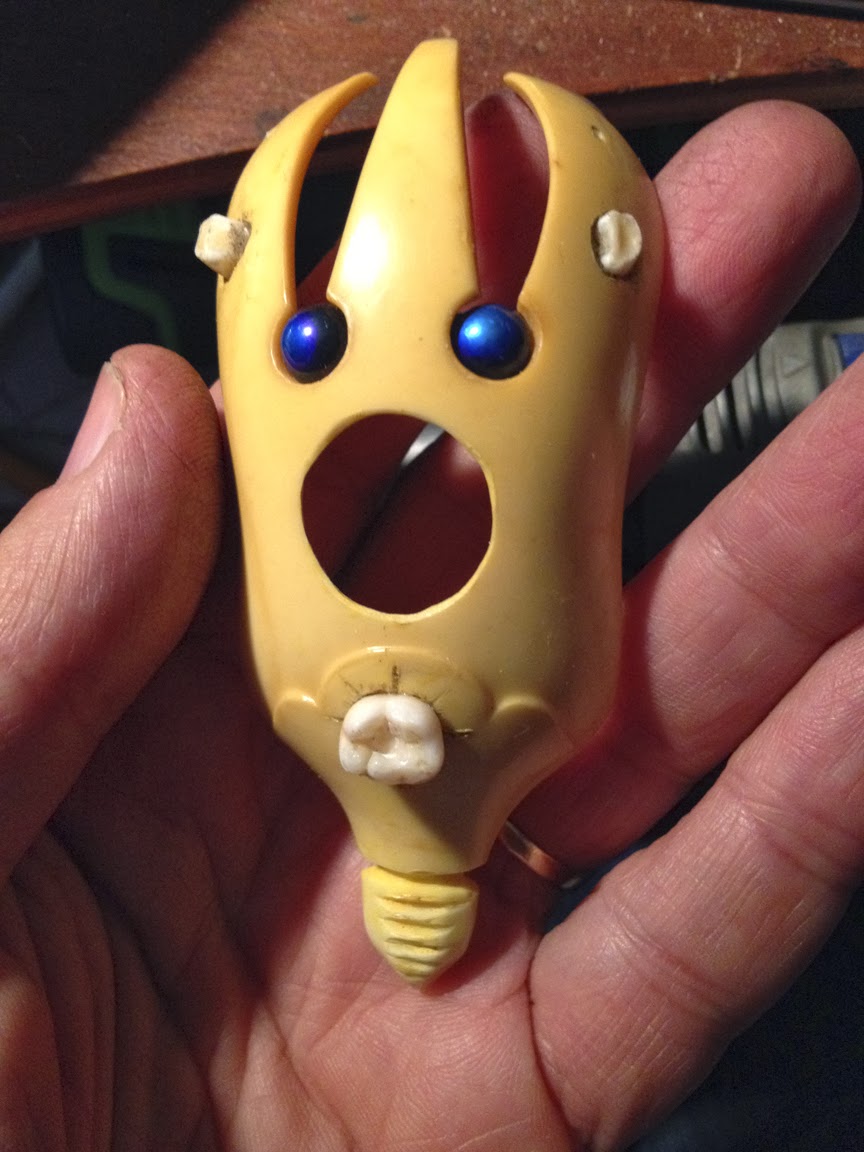
Now turning back to the fork, I create lateral piercings to accommodate two more of Mira's teeth.
These teeth are set in place as well as the glass beads.
The wood is now painted a deep brown.
My hope here is to build a chamber that will contain several more of my daughter's teeth, while having an active rear view. This lens with plated brass housing is almost pitched back in the pile when I spot an uncanny fit that keeps it in play:
This small pocket watch face slots inside the lens assembly as if it were made for it.
Now the fitting is ground down save for three small tabs which will prong into the wood body.
The lens fitting is sealed to make it watertight, and a beautiful 1860's color lithograph becomes the face of the face, as it were.
A nest of teeth are affixed in place with resin. They will next be completely encased in the resin once all elements are together and ready.
One of my resin lenses is made for the hole in the fork, and sea urchin spines are arrayed around it. These spines will share the resin bath with the teeth.
A last minute decision is made - as the resin is setting in the lens fitting, I apply pressure the center of the crystal, shattering it, but the lens remains in place.
Next an engraving is selected that will peer out from the fork's tines.
The hands, holding a mask, become the image surrounding the watch face on the back of the piece.
An inscription is made and tiny opal set...
...and keys are riveted to some beautiful antique green elastic cord.
My wild-card choice is to use waxed linen thread between the pendant and cord. This last shot of color and texture finishes the piece out.
To view the finished piece and to see Mira enjoying it:
http://www.lobue-art.com/lifes_record.html
See you next week for a piece that, even by my standards, is over the top!
Keith
Some projects lie close to the heart from the inception, and form more as an act of joy than anything proscribed or pre-meditated. This may well be the piece of artwork with the longest gestation period of any in my career.
Sixteen years ago I made a promise to my then-newborn daughter Mira: on your sixteenth birthday, I will make a wearable work incorporating your baby teeth. So I worked diligently in collaboration with the Tooth Fairy, collecting the tiny jewels as they fell like ripe fruit from her little mouth.
The years have flown by, and I find myself in the delightful situation of locking myself in Studio Stuffsmith to actualize this long-held promise.
My generative impulse kicks into gear as I choose for the opening gesture an implement of eating: this beautiful Art Nouveau serving utensil set made from an early plastic called Pyralin Ivory. The fork is particularly pleasing as my housing, and I set upon it.
The bowl is separated from its handle with a quick cut from the jewelers saw.
The raw end is now shaped to a decorative terminus as I opt to have that end as the bottom of the piece.
Scooped from behind,
...and polished. The visual and textural similarity to tooth enamel is striking, and prompts the first tooth out to play.
Although some have been squeamish of the idea of using teeth in jewelry making, there is a long and venerable history of the practice throughout the ages and in many cultures, all the way to the present day.
I have always felt that teeth are the most jewel-like parts of the human body; sheathed in enamel and resistant to corrosive forces. The key for me here is to avoid the piece becoming too macabre or ponderous, while indulging Mira's aesthetic leanings towards Gothic fashion.
The substantial molar takes center stage here, as I choose the placement. This also marks the back of the fork as the front of the piece. I'm chuffed by the color integration of these jarringly different materials.
Now, Dentistry, Lo Bue-style.
A circular 'bezel' is drilled into the center of the molar to affix a jewel later.
Now to hollow out a recess for the molar to inhabit.
Wet work with a diamond bur.
The shape made, it is now decorated with radiant lines and pierced with setting holes.
Now an aperture is decided upon and drawn in place. I cast the lens to the left from resin.
Despite the respirator during this sawing, the scent of camphor fills the studio as the early, organic plastic gives way.
I decide at this stage to create a solid body that will fill the cavity (pun intended) of the fork. Keeping my children close, I choose this slat from my younger twins' crib to perform the function.
Join me next time as I set Mira's teeth on edge, as it were!
Ciao
Keith
Ricë over at the Voodoo Cafe has interviewed me about life and creativity, with a special focus on the piece just finished here on Stuffsmith, "REFLECTIONS."
You can find the podcast here.
Enjoy!
Keith
Here we are to see The Story Without End, um.... End.
Small brass bails are made to attach the clay pipe to the back of the piece.
A bail, patinated and attached to a leather cord.
Threaded through the hole in the copper name plate...
...and capped with the second. This will leave some options to attach on the outside loops. It's also a very gentle and supple way to attach a fairly fragile material - in this case, the clay pipe piece seen in last installment.
The large slotted bolt is too harsh and sterile for the piece, and I decide to alter it.
Ready to work on it.
To a grinder first.
Then shaped with files...
..and on to the sandpaper.
Polished and ready to replace.
I'll be looking to patina all the bright metalwork, but at this point I'm pleased with the revision.
A beautiful little pearl is chosen to hang inside the steel blade, so wire is worked to make this happen.
The pearl is far too large, so a tiny pearl will take its place...
I love how the pearl rests on two points of metal below it, echoing the open circle below it.
Now I'm hunting for an eye engraving to mount in the blade recess I've made, and this stunning steel engraving is perfect.
It needs to be soaked off of a scrapbook page, where it has been glued for 150 years.
In place. To those who noticed a small hole in the recessed area where the engraving lays now, a miniscule opal is mounted to peer out from the back side of the blade.
Moving on now to the chamber in the heart of the piece. First, a panel of 16th-century book paper is carefully laid in place.
Now a spray of sea urchin spines are attached, along with a tiny starfish, both of which will not be immediately viewable when looking into the lens, but around the periphery, offering furtive glimpses rather than a quick read.
The inside of the lens housing is first painted off-white, to allow maximum light inside.
Now with paper affixed, the amount of light surfaces will negate the need for direct frontal lighting to make the interior visible.
At long last, I can attach the lens assembly to the front of the neckpiece.
Now I'll find an element to hang from the bottom loops by the name plate.
Beautiful old copper-plated steel chain with a shoe button works well here.
Really bothered by the tangle of chain on the upper part of the pendant - so the solution comes after fiddling with it for a while - the little chains are dropped down alongside the handle, rather than drooping upward. The balance immediately rights itself visually, and frames the whole piece.
Now I can patinate the metal and take beauty shots - we're done.
Come see it looking its Sunday Best:
http://www.lobue-art.com/story_without_end.html
And for all of the above plus purchasing information:
http://www.lobue-art.com/story-s.html
Thanks for taking the trip with me. Next week I'll be showing a major commission taking shape - one that is emotionally loaded and quite an experience.
Keith




 Posts


