skip to main |
skip to sidebar
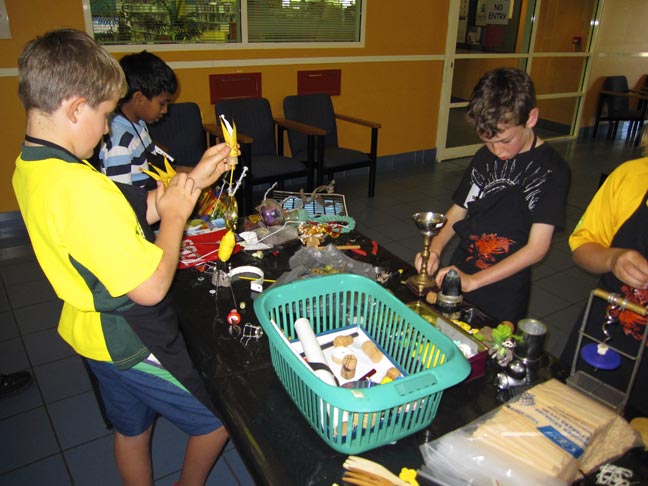
Before I jaunt off to the US to teach next week, I thought I'd post up the brilliant work done by an enthusiastic group of fifteen 8 to 14-year-old's up at the gallery where my exhibition is taking place. Called the 'Mudskipper's workshop', the kids were challenged, in the two-hour class, to use their own ingenuity to cobble the piles of junk in front of each of them into something interesting. Without glue.
Check out what went down. (Click on images to enlarge them)
A few mums stayed and got their hands dirty as well.
Serious concentration.
A spaceship, complete with control keyboard, takes shape. Check out the smart use of electrical tape.
My oldest daughter Mira, right, finds a new buddy.
No timid moves here - it's unchecked creativity at work.
Decisions, decisions.
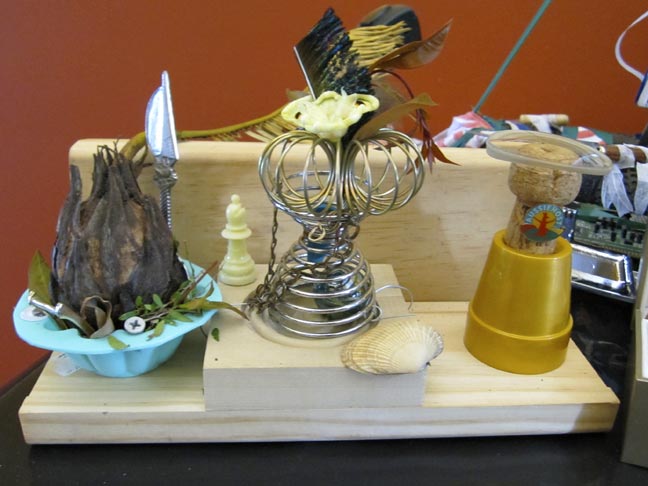
An impromptu exhibition was set up on a table so we could all admire the handiwork.
Puppet, with stand and pet!
A house for secrets.
A portrait in sheep spine, of her dad, apparently - are my eyes really that screwy?
A beautiful assembly of fresh plants, which can be replaced at will.
A hanging garden of treasures.
The amazing flying lion!
A complex little contraption.
A gorgeous little viewing portal and treasure trove.
The spaceship - that's a steering wheel and hubcap put to really good use.
A beautiful and sensitive fish sculpture.
An intimate Pandora's box.
This catapult shoots something long and thin that I can't remember - was it pick-up sticks or knitting needles? Don't try this at home!
A lovely display of tiny sculptures - what a set.
The Hervey Bay Artists Gang, in da house. Congrats to them all!
I'd encourage any of the artists above to post down below and let us know which one you did.
See you soon,
Keith
Welcome back. Sorry this took so long - I've just been up in Queensland opening my exhibition. More on that next week. Now to the matter at hand:
My attention now turns back to the turnbuckle that will suspend the glass plate. After hours of drilling and threading it and making two tiny set screws, they prove too weak for the task. I drill the holes out larger (a scary task as there isn't much room left in the width of the metal) and tap threads into them.


 Brass wire becomes a more substantial set-screw.

 The turnbuckle ready to go. One of the revelations, somewhere along the line, was that this machine can be fitted in the future with several glass plates, so it truly becomes a viewing machine, like the stereoscopes and zoetropes of the 19th century. When the piece comes back to me after its showing in Queensland, I'll set about doing just that. But before I get too ahead of myself, I'd better make sure the thing works!
 An issue here - chain doesn't like being squeezed between other metal parts. Not a good solution. That night in a half-awake state in bed I realize that waxed linen thread would be strong, supple, squeezable - and replaceable.
 Re-drilling the holes on four fresh-water pearls to allow for the heavy linen thread.
 The assembly together.
At this point I need to address one of the things I've enjoyed about this machine, and this is the fact that there are no right angles in the entire structure... The glass plate itself and the brass frame that encloses the image are both way off square. The candelabra base, being most probably a souvenir made to be sold on the roadside means that the upright part of the base is tilted at an extreme angle.
I hit upon the idea of making threaded feet that lift the flat base off the table and allow for adjustments to make the whole piece 'feel' balanced visually.
 Unfortunately, this means drilling major holes in the base. At this late stage of the piece, this is a palm-sweaty affair.

 Tapping the holes.
 Threading the brass rod to make the feet...
 ...and slotting them.

 Now that it stands more or less upright, I can try the machine out. After ten weeks of problem-solving a structure that was only theoretically a working device, it's a real delight to see and hear the elements working with each other.
In trying to make this machine as independent from me as possible, I decide to make a small screwdriver that would be attached to the machine to allow anyone to make all these various adjustments. I realize now that this is the last step to completing the piece.
Now that it stands more or less upright, I can try the machine out. After ten weeks of problem-solving a structure that was only theoretically a working device, it's a real delight to see and hear the elements working with each other.
In trying to make this machine as independent from me as possible, I decide to make a small screwdriver that would be attached to the machine to allow anyone to make all these various adjustments. I realize now that this is the last step to completing the piece.
 A bar of square nickel silver wire and an old clock key fit the bill.
 Forging the blade.
 It'll need to fit in the square hole of the key.

 A few taps with a rawhide mallet gently seats the nickel into the key.
 A quick decision places the screwdriver front and center on the base.
 Adding a slot to the hole to accept the blade.
 The screwdriver chained and in place.
The last several days are devoted to making the descent and ascent of the plate as smooth and reliable as possible. There is an unknown hang-up that causes me to disassemble and reassemble the structure at least half a dozen times until I find the culprit. How funny that the thing that stopped the works for these last few days was the thing I spend so much time and effort circumventing:
Glue.
Back when I tried to lock the chain into the turnbuckle, before I thought of linen thread, I was desperate to try the mechanism but the chain was slipping through the set-screws - so I added a drop of superglue to one side of the chain so I could try it. I promptly forgot about it when I changed it to waxed linen, but there was a tiny spot on the chain where there were four links glued stiff. This tiny rigid spot hung up in the little curved tubing channel in the top of the structure. If I'd only known earlier it would have saved me days of difficulty.
No wonder students have dubbed me Keith No-Glue.
Thanks for sticking with this long process. I hope you had a taste of the enjoyment I felt making it. You can view images of the finished piece on my website here:
Beauty Shots of POETICAL MODESTY
At the end of the pictures, you can watch a video (available in HD for those who'd like that) of it in motion. For those with less patience, you can go straight to the video here:
Video of POETICAL MODESTY
And lastly, for those interested the piece is indeed for sale and info can be found here.
Cheers!
Keith
In this post we'll see Poetical Modesty come together from its many component parts.
The last thing to do before attacking the wooden box (still a frightening prospect) is to remove the end nuts of the candelabra arms (each of these held a candlestick holder). I decide, since it's a lovely clover shape, that I can reuse at least one of them in the piece.
 Sawing the end pieces off...
 ...and replacing them with more curved tubing.
 The time is here at last. I trace the line of the frame to be cut away in the back of the box.
 'Round these parts, we call this: Voiding The Warranty.

 Only a very deep saw frame will cut a panel this large. This jeweler's saw has a 10" throat.
 Pierced. Now to finish the edges and carve the inside away to allow for the glass to slide in.


 An exciting moment comes when I can view the glass behind the shape of the frame. With a rush I realize the piece is really coming together.
 An intimidating image - the box laid low.
 Painted black with black silk velvet about to line the interior.
 Now the bottom edge of the box is carved to inset the candelabra.

 This brass plate has been etched and will drop into the inside bottom panel of the box for some extra stability.
 After making a bolt out of one of the clover ends of the candelabra, I can thread it through to see if it will do the trick. All set here.
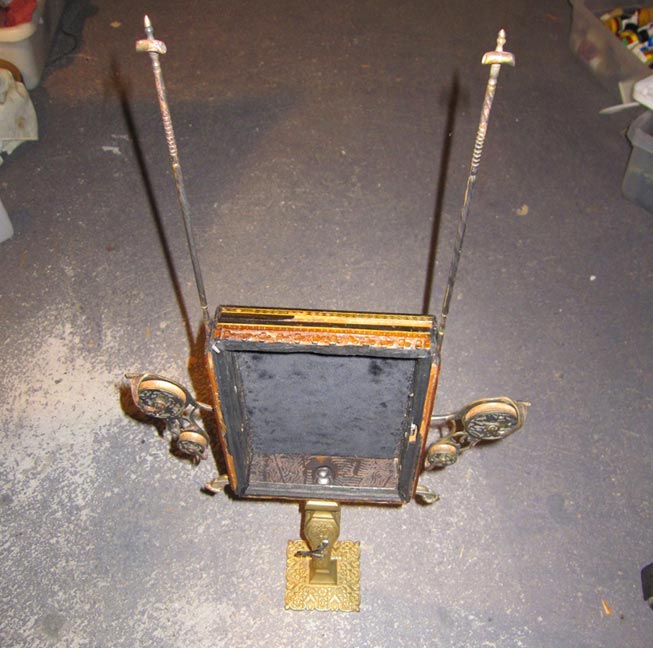
 Another big moment - attaching the side pulley structures. As soon as these are on I have the bare bones of the machine assembled - it will stand on its own now.
 I spend a good amount of time with it at this stage, trying to see what else should be addressed before going much further. The box interior now gets lined with beautiful velvet. I can't find proper silk velvet after looking at several shops (only synthetic), so I come home and cut the corner out of my dear and valuable 22-year-old old piece of backdrop velvet for my photographing. Painful but necessary.

Time to get the brass frame finished and mounted to the box.
 Piercing square holes into the corners, to inlay four beautiful cut Czech crystal cubes.
 These are joined by some very old brass floral elements that I just acquired on my last US trip.
 The back, painted and polished to let the glass slide easily.
 This is how it will read when it's finished. I love the ornate framing.
 Fabricating a cross-brace so the uprights don't bend inwards with the strain of lifting the glass.
 Turning to making an assembly from which to suspend the glass, I choose these great old steel nut picks, which I'll saw apart and join in the middle so the ball ends face outward.
 Annealing them to allow for drilling.

 Here's a delicate moment - tapping threads into the holes to put in some set-screws. So delicate, in fact, that about one minute after this photo is snapped, something else snaps. So with the tap broken off deep in the nut pick, I chalk up a full day to a blind alley and look for a different hanging element. It doesn't take too long to come up with a Plan B.
 I've picked up this brass/steel turnbuckle over and over again through the years, but obviously it was waiting for it's time. I can see that this device will allow me the benefit of being able to adjust the arms in and out for the best width.
 The loops are sawn open and drilling starts for making set-screw areas.
 The brass piece in the center has been made more ornate. Note the tiny set-screws in place near the ends. These will be replaced later with bigger ones, as the screw heads prove too delicate.
 I finally un-tape the chain and allow it to spool out. I can hardly believe I'll see it in one piece so soon.
 Screwing the box back (now front, from here on!) into position.
 The clover-bolt attaches box to base and the machine, minus a few more bits, is together. Only about a day or two away from actually, dare I say, testing it.
Tune in next week for the final posting.
Keith