Sunday, November 28, 2010

Two Kinds of Courage, In Progress - Stage 2.

Hello! Let's pick up where we left off last post. This piece is going through many changes, and the biggest ones are yet to come. Flipping the piece over, it's time to address this vantage point.


 I made a piece with this essential structure back in 2005 and am very fond of it still, so I'm going with this really singular specimen of seaweed root ball - the double inverted cones have an unavoidably facial effect - especially after  I saw the root ball in half depth-wise so holes appear in back of this chambers. 

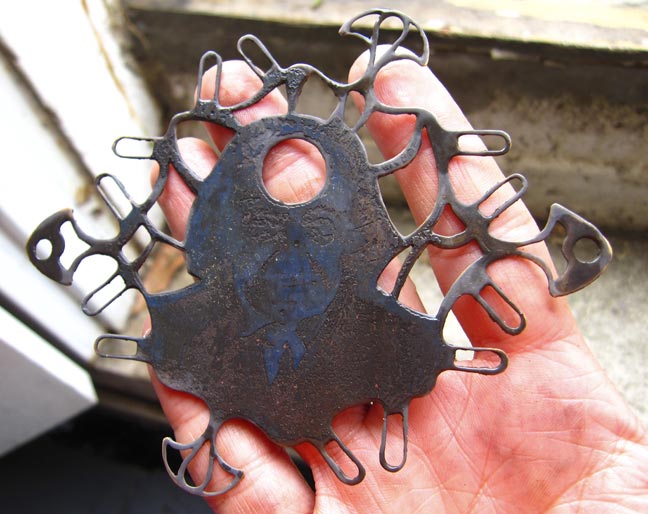
So with this element chosen, I return to the etched face on the flip side. That side must be finished before I can work more on the root-ball side.

 I made this glass 'lens' in my kiln a few months back.


 Great fit.


Meanwhile, I'm thinking about an element to hang down from the trap jaw, weighting the piece so the spigot can revolve. I choose this exquisite chandelier crystal from the mid-1800's and prepare to modify it.


First it's cut down and shaped.


A concavity is ground behind the beautiful sunburst pattern.


Seen from the front. The hole will be set with a dichroic bead.


Now a design is drawn for a backing plate of brass that will tab-set the crystal and allow it to hang.


...and sawing begins anew.


Cut and etched.


 A face to peer from the crystal.


And imagery to be seen from the back.


 Readying to assemble this unit - Notice the bead has been inserted and ground to lay flat with the surface of the glass.


 Imagery is collaged into place.


Now it's ready to set into the brass structure.

Time to prepare how it will hang from the trap.


Drilling the old steel.


Fitting a staple through with riveted ends.


 The crystal hung. This arrangement didn't sit well with me, but I decided to move ahead with the spigot handle so I could get a better overall idea of what needed to be done with this lower part.
The seeweed roots being prepared with small eye pins so I could tie it in place with waxed linen thread.


Just about to get tied into the spigot.


Suspended in place.


Turning it over, an engraving of eyes are affixed to the back, and labradorite beads are arrayed around the trough of the handle, so when the brass plate is attached over the top, they will be trapped but will be able to rattle inside.


Now the brass side is readied - a lovely color lithograph of a hand from 1880 will be behind the lens. Covering the back of the plate will be this map, from mid 19th-century. Most of this will be covered up by the root ball, but bits will peek out here and there.


The brass leaches some beautiful verdigris into the paper.


A big moment for the piece as the very thin and fragile tabs are bent around the spigot to lock it all in place.


 Little by little they embrace the edge.


 Now I can see the mechanism rotate for the first time.


I love the rotation.
But I don't like the piece.
Part and parcel of working in an intuitive manner is the possibility of working things in the wrong direction. Luckily over the years I've come to see these setbacks not as a waste of time, but as a fork in the road for me to change direction.

The piece is too large and lifeless to me. In fact, the hanging crystal below is simply too strong and detailed an element on its own - looks like I've made two separate pieces of jewelry. So with a wince and a smile...


...I snip the bottom piece off. It doesn't need to be there - it leaves the nest for later use.


Now I'll have some real rethinking to do. The neckpiece is turning a corner, one I hope will bring the spark back into it.


See you next time!


Keith


Thursday, November 11, 2010

Two Kinds of Courage, In Progress - Stage 1.

I've been back in the studio working on another piece I'd like to share with you. At the time of this writing I'm not positive about the title being used (I'm still working on the piece), but I'll go with it assuming it's going to stay.

The first instigative element for this piece is a spigot handle - I've used many of these to pleasing effect, and I'm all for exploring the form further. Two of the neckpieces I've made with them are among my favorites, but I'll try not to let that weigh on my mind as I work, lest it influence the process.


This is the orientation I've been viewing as the front (though my plan is to make it rotate, leaving either side in front).


I love the receptacle around the perimeter, and plan to use that. 


First job is to remove the middle structure, which makes the spigot very heavy.


Now it's about 1/3 the weight.


The spigot will rotate nestled in the jaw of an animal trap.


Free at last. No animals were harmed in the making of this artwork.


An earlier piece I made, The Pearl That Worldlings Covet, employs the trap jaw UNDER the spigot, making the attachment more of a challenge. I'm going with it.


Into the tumbler goes the trap jaw. It'll take at least 24 hours.


Meanwhile, using a copy of the spigot on paper, I begin to design a metal plate that will both embrace the spigot and create a rotational mechanism for the piece to move.


 As the drawing comes together, I decide to have a bust etched onto the plate in the center. I need to pick this out now, as it will dictate how to pierce out the interior of the metal.


 At a recent etching workshop I was giving (yo, Ginny!), I managed to create my best etched image yet - this prompts me to use another daguerreotype image to be etched onto the plate. I can already tell it'll be the most demanding etching job I'll try. The older man in the right window is my subject.


 His silhouette now becomes the focal design in the center of the plate. I like the asymmetry of this.


 Oh yeah - now the plate must be cut. This is a thinner gauge brass than I've been using in my previous pieces, so it moves pretty quickly.


 Cutting finished.


 Checking the fit...


Looks good so far. Now to finish the edges of the plate and polish it.


Ready now to get the face etched on.


Although this PnP Blue etching paper has its drawbacks, it is wonderful to use in this fashion.


Registering the image to the plate.


 And transfer complete...now to etch.

I decide, after some hesitation, to use ferric chloride as my etchant, rather than the saltwater etch I've been using of late. This is because I will have more precise control over the depth of etch this way. I'm also etching imagery on the back of the plate as well, so it needs to be suspended in solution.

 
 In the oven, so to speak.


The plate comes out and is blackened - and it looks like a good etch.


 The plate finished and ready - cleaned, patinated and partially shaped - ready to lay aside for later.

In the next part, I'll flip this over and start to realize the other vantage point, as well as consider the trap jaw - and really, shouldn't we all, when it comes down to it?

Take care till next time.

Keith