skip to main |
skip to sidebar
Welcome back. In the last post, I created my first digital work on glass, then began the process of developing a stage-like machine in which to view it.
The mechanism of the piece is very important, as I want to see the motion of several wheels as the glass is raised and lowered. And for the first time, I am going to be making all the machine parts by hand, rather than using found objects. Combined with the found elements - the box itself and the candelabra base, I hope to make it a genuine parlor device.
A pulley system is what I need, so using my quick sketch as a guide, I make a careful rendering in Photoshop of the pulley wheels, referencing the crank I'd made earlier so they'd all work visually together.
 The image of the pulleys is glued to my brass sheet, as with the crank, and I ready to drill and pierce the negative spaces out.
 My trusty Dumore begins the work of drilling. I want a car with this wrinkle-paint finish.
 Looks like I'll have my work cut out for me. I wish, actually.

 Cutting out and shaping the mahogany discs that the brass wheels will embellish.
 Creating an inlay area.
 Dyed New Zealand paua shell is then sandwiched between the brass and wood. Here, the first of the four pulleys coming together and viewed on the drawing for the backing plate.
 And the backing plates being prepped to cut out.

 The tiny chain that I envisioned using as a drive belt would need some guides to be fed through so it wouldn't rub on anything. Here I'm bending some brass tubing for the job.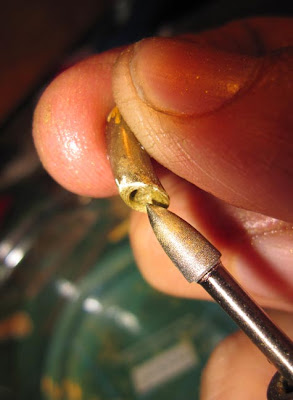
 These little shapes will mount at the top of the structure for the chain to suspend the glass from.
 One of the large pulleys about to get riveted together..
 Brass wire getting decorated as one of the support rods.
 The little brass guides are soldered in place at the top.
 After all this prep it's a rush to sit the elements together so as to see the general structure taking form.
 Setting it up as I pictured it in my drawing, the pulleys seem awkward in this position. This is why my sketches, when I do make them, are really rough and it's assumed they act merely as a launching pad, rather than a technical blueprint. I move the pulleys down the sides until the whole composition has the right balance. What a thrill to be working on something so large after my long absence from making larger work!
 Looks like it will work well, but there are a lot of unknowns ahead. Setting it all aside for now, I set about assembling the two side pulley structures.


 Curling the ends around to straddle the pulleys.
 One side finished, I can't resist feeding the chain through and pulling it back and forth to see the pulleys operate. Good so far.
Next week: fabricating the chain reel & cranking system, and deconstructing the box. Tune in!
Keith
 As I've been squirreled away in Studio Lo Bue for the last month+, it's time I get you up to date on the creation of my newest sculptural work, which at this moment is about two days from completion. I need to give you some background on how it came to be.
The last year of experimenting with my kiln and various glass techniques has led me to working out how to fuse imagery onto sheets of glass. For the first time (ever!) I'm feeling a little bit proprietary about the process, so give me some time to explore it further before I disclose how it is done (simply put: sorry!). Suffice it to say it is a tweaked adaptation of several available products and processes. Whatever the case, I am able now to make my own species of ambrotype. This was a 19th-century form of photograph in which the film emulsion was brushed directly onto glass and a negative image exposed onto it. When the glass image was backed with black velvet, the image would read as a correct positive. Any of you who see tintypes in little cases regularly will have seen many ambrotypes without even realizing it - they appear to be tintypes once they are backed with black.
After getting this method to yield satisfying results, I decided, as a piece made especially for my upcoming exhibition, to create a piece of digital collage artwork and then to fuse it to glass, thereby creating my first digital/glass hybrid. The name of the digital piece, and by extension the whole sculpture to accompany it, is POETICAL MODESTY. Here is the glass plate getting fired to fuse the image.

 Baking...
 ...and cooling (note lower shelf of experiment images).
 The finished plate as seen backed with white. It is about 7.25" tall. When it is placed in front of a dark color, it reads this way:
 As I prepared to fire the piece, it occurred to me to make some kind of turning crank that would raise and lower the piece into a black 'stage' or box. I prepped for that by making sure there were two holes in the top of the glass to be used for mounting to an as-yet-unknown system.
I felt that somehow the perfect place to start on creating a mechanism for the glass plate was to create a beautiful, extraordinary hand crank. I happened to be browsing on that day through images of historic astrolabes. The crank's design is adapted from an amazing Persian astrolabe from 1660.
 A real piercing challenge, using 16 gauge (1/16" thick) brass.

 Cutting the wheel out first.
 And the design slowly appears:


 Riveting on a gorgeous tiny brass drawer-pull as a finger grip.
I spent a few nights tossing in my half-sleep, trying to think of the enclosure for this plate to drop into. I knew I had several boxes that might work, but one of them - this Russian 19th-century carved wooden box - was sized perfectly. I have been loath to use this box in the past (I've been saving it for about 14 years), as the beauty of the carving is breathtaking. But I just couldn't ignore the appropriateness of the box. It was at this point that I knew I was going to have a very special object on my hands.


 And just to make me see that my choice was a correct one, I pawed through my extensive stash of Victorian keys - and after an hour, found one that operates the catch - what are the odds??
 Letting them get to know each other so a design will emerge.
I placed the box face-down so that I could open the bottom up and leave the carved top intact - the carving would act as the back of the finished piece. I decided to accentuate the ambrotype quality of the glass piece by creating a brass frame around the hole in the box. I scanned and adapted an actual tiny daguerreotype frame and got ready to fabricate a large brass frame for the front of the piece.
 Printed onto special etching transfer paper.
 And ready to iron it to the metal to act as a resist.
  Ready to be etched.
 This was the first time I've tried to etch using only salt water and a "D" battery - in my aerating vertical etch tank it was brilliant - a non-toxic way to etch. I'll be sticking with this.
 Out of the brine.
 Removing the center. A daunting job for a jeweler's saw due to the dimensions.
 Beveling the edges.
 At this point ideas are coming fast. Some sketching gives me some ideas for a pulley system, which I've decided to fabricate from scratch.
 Although initially I'm not sure I'll use it, I am drawn to this old Indian candelabra (I used part of the matching one in my book piece "The Diary of an Antiquary" from last year). Once I start drawing the candelabra as part of the piece, the whole structure falls tentatively into place. And it will become a sort of rough blueprint for me to follow:

Next week - stage two.
Sorry for the delay, all. Here are the identities of the last round of objects (for those who haven't seen the last round, find them here:
#8: I marveled at this little personality when it came tumbling out of my Special K box one morning - as I was about to post my mystery objects, I thought it was an obvious sign from the breakfast gods. Couldn't bring myself to eat it though - it's now in my studio, awaiting.
#9: Corner bumper from an old suitcase - dragged from the Deer Island Dump in 1996.
#10: One of my early found items - it's the side panel from a champagne corkscrew, circa 1830's. It's one of the objects I think I would have wanted to save intact, but what did I know then??
#11: A fulgurite. This beautiful natural object occurs when lightning strikes sand or soil and fuses the surrounding ground into glass. Peering into the hole, you can think of it as a negative of a lightning bolt. Amazing. More info on fulgurites here.
#12: Good guessing, all - it is indeed a pierced brass cage for a work light, here shown open. I've flirted with making this into goggles since I found it way back.
#13: This is the inner plastic seal from a drink bottle, encrusted with sea life. Found on the beach.
#14: No one got this one. It's a Roman-era horse boss, which is a bronze decoration attached to the animal's harness.
Thanks for playing to those who gave it a whirl, it was very fun.
Lots to post in the coming week - firstly, I'll announce the winner of my upcoming DVD - those who sent me images of their own mystery objects were eligible. Look for that in a few days. Following that, I'll start you on the in-progress journey of my new sculptural object - another series of firsts for me. It's still being made now in my studio, and is coming along well - and is really unlike anything else I've made.
Ciao!
Keith

 The image of the pulleys is glued to my brass sheet, as with the crank, and I ready to drill and pierce the negative spaces out.
 My trusty Dumore begins the work of drilling. I want a car with this wrinkle-paint finish.
 Looks like I'll have my work cut out for me. I wish, actually.

 Cutting out and shaping the mahogany discs that the brass wheels will embellish.
 Creating an inlay area.
 Dyed New Zealand paua shell is then sandwiched between the brass and wood. Here, the first of the four pulleys coming together and viewed on the drawing for the backing plate.
 And the backing plates being prepped to cut out.
 The tiny chain that I envisioned using as a drive belt would need some guides to be fed through so it wouldn't rub on anything. Here I'm bending some brass tubing for the job.
 These little shapes will mount at the top of the structure for the chain to suspend the glass from.
 One of the large pulleys about to get riveted together..
 Brass wire getting decorated as one of the support rods.
 The little brass guides are soldered in place at the top.
 After all this prep it's a rush to sit the elements together so as to see the general structure taking form.
 Setting it up as I pictured it in my drawing, the pulleys seem awkward in this position. This is why my sketches, when I do make them, are really rough and it's assumed they act merely as a launching pad, rather than a technical blueprint. I move the pulleys down the sides until the whole composition has the right balance. What a thrill to be working on something so large after my long absence from making larger work!
 Looks like it will work well, but there are a lot of unknowns ahead. Setting it all aside for now, I set about assembling the two side pulley structures.


 Curling the ends around to straddle the pulleys.
 One side finished, I can't resist feeding the chain through and pulling it back and forth to see the pulleys operate. Good so far.


 Posts
Posts


