skip to main |
skip to sidebar
Thank you all for the kind words about seeing the process as I go. Picking up where we left off last post...
 The kiln reveals my tiny glass lenses, fused to the steel strap.
 Left, a drawer-pull as it was originally, right the result of two fuse firings.
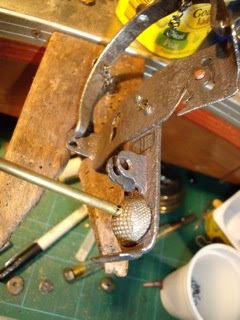 Top of a 150-year-old thimble getting tube-riveted into place.

 Laying the lens in place where it is to go. The tab of the lens has been riveted into place on the trap, but it acts as a pivot point, so it will be chained into place from above.
 Creating the object to be viewed through that lens: a sawn-down piece of seaweed roots, with tiny shell fragments still embedded, will become the organic center of the piece.
 The lens gets attached in four places with the tiny chain.
 The drawer pull, now in place, will need to be suspended from the iron jaw above, so time to modify those parts to make that happen.
 The drawer-pull ready to be drilled
 with a tiny pin drill and miniature bit.
 The steel jaw gets similar treatment, this time with a flex-shaft tool behind the bit.
 Having finished with the metal manipulation of the trap, I can attach the more delicate materials with less fear of damaging them. The keyhole first, with glass fused into it...
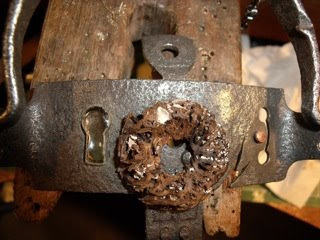 The keyhole as it will be seen from the front.
 A pearl to live in back.
 Removing an eye for the central opening in the root ball.
 And put in place.
 Which leaves me safe to attach the lens permanently, as well as the little drawer-pull above. Now the structure is coming together.
 Hand-drawing the text for the title into some asphaltum resist, which will then be etched into the nickel-silver bar.

 While it's etching, I can move on to the cord.


 Creating the clasp.
 The hanging mechanism, complete.
 The etched title bar is shaped,
 and elements are created for it. Here I've taken two antique earnuts and some fine steel wire.
 The whole assembly soldered together.

 Creating the hanging element for the title bar completes the piece.
 The neckpiece hung on my 'just finished' hook, awaiting its studio photo session.
************************
The finished images of 'Two Sides of History' can be viewed here.
Or, for the person who simply can't live another day without owning it (there's only one out there!), you might prefer to check it out here.
At the time of writing this, I'm deep into a new neckpiece that will be posted here next week after my teaching weekend in Melbourne.
Thanks for visiting. Ciao!
The following sequence of images will bring you on a tour through the making of my newest neckpiece, entitled "REPETITION / CHANGE." The beauty shots of the piece will be posted on my website in the coming day or two. Hope you enjoy. The object of my affection: Angering classic cars buffs the world over, I prepare to gut an early 20th-century automobile radiator gauge
 The double-sided glass bezels are hard to resist
 The thermometer, lodged firmly in place by century-old ossified rubber
 Intact - phew - and put aside to be used some other day
 As it's quite a heavy hunk of metal, I give it some consideration, trying to see what it can live without
 Testing out the new cordless Sawz-All (Pocket Review: It rocks)
 Sawn, and
 on to the interior...
 Sawing out needless weight
 Tough work.
 Too tough. No worries, panic averted as I realize the piece will be held together with screws on both sides, remember?
 Nut, shaped and tightened, so I can hang an element from below
 Miles & Audrey on the studio steps, making sure dad's doing it right
 Beautiful Victorian key, ready to be sacrificed for Art
 Keys soldered square brass wire
 Balling up some copper wire
 Copper wires run through the brass and
 forged
 then folded down into hooks, small brass wire being threaded through
 finishing the wire outer structure
 and the main housing ready to be occupied.
 Money well-spent in Port Gamble, Washington
 Beheading the subject - a steel-point engraving from 1845
 Mid-bling: tiny silver balls dropped into the starfish legs, to be finished with a tiny opal in the mouth
 Starfish set, and the resin being colored
 Beautiful little seed 'cups' scavenged in Hall's Gap, Victoria
 Filled with pearls
 and placed.
 As is often the case when trying to seal chambers full of resin, airbibbles appear the next day after it semi-sets. Time to inject resin into the bubbles. Luckily there is a tiny gap between the glass crystal and the metal, or I'd have been out of luck.
 Had to make a custom hypodermic out of an insulin syringe and some stainless tubing (the original syringe was too tiny to suck up the viscous resin)
 Fixed
Fixed.
 Couldn't resist adding some sailor's touches...


 The copper elements of a swivel-connection to go between the pendant and the cord
 The assembly riveted to the key and patinated

 Choosing lovely little keys to hang the piece from
 Riveting key to cord
 A lovely old wooden dresser knob to hang underneath
 Tapping a thread into the knob
 Voiding the warranty on said knob
 Drilled out
 Sanded and painted.
 A miscast glass pebble becomes the best of the bunch for me
 The pebble ground down to fit
 A beautiful symbol from a 16th-century book to be refracted behind the glass pebble
 The chamber gets a resin assembly
 The piece is signed (KL •9•), waxed, and readied for
 photographing
.

 The kiln reveals my tiny glass lenses, fused to the steel strap.
 Left, a drawer-pull as it was originally, right the result of two fuse firings.
 Top of a 150-year-old thimble getting tube-riveted into place.
 Laying the lens in place where it is to go. The tab of the lens has been riveted into place on the trap, but it acts as a pivot point, so it will be chained into place from above.
 Creating the object to be viewed through that lens: a sawn-down piece of seaweed roots, with tiny shell fragments still embedded, will become the organic center of the piece.
 The lens gets attached in four places with the tiny chain.
 The drawer pull, now in place, will need to be suspended from the iron jaw above, so time to modify those parts to make that happen.
 The drawer-pull ready to be drilled
 with a tiny pin drill and miniature bit.
 The steel jaw gets similar treatment, this time with a flex-shaft tool behind the bit.
 Having finished with the metal manipulation of the trap, I can attach the more delicate materials with less fear of damaging them. The keyhole first, with glass fused into it...
 The keyhole as it will be seen from the front.
 A pearl to live in back.
 Removing an eye for the central opening in the root ball.
 And put in place.
 Which leaves me safe to attach the lens permanently, as well as the little drawer-pull above. Now the structure is coming together.
 Hand-drawing the text for the title into some asphaltum resist, which will then be etched into the nickel-silver bar.
 While it's etching, I can move on to the cord.


 Creating the clasp.
 The hanging mechanism, complete.
 The etched title bar is shaped,
 and elements are created for it. Here I've taken two antique earnuts and some fine steel wire.
 The whole assembly soldered together.
 Creating the hanging element for the title bar completes the piece.
 The neckpiece hung on my 'just finished' hook, awaiting its studio photo session.


 Posts
Posts


