skip to main |
skip to sidebar
In this post we'll see Poetical Modesty come together from its many component parts.
The last thing to do before attacking the wooden box (still a frightening prospect) is to remove the end nuts of the candelabra arms (each of these held a candlestick holder). I decide, since it's a lovely clover shape, that I can reuse at least one of them in the piece.
 Sawing the end pieces off...
 ...and replacing them with more curved tubing.
 The time is here at last. I trace the line of the frame to be cut away in the back of the box.
 'Round these parts, we call this: Voiding The Warranty.

 Only a very deep saw frame will cut a panel this large. This jeweler's saw has a 10" throat.
 Pierced. Now to finish the edges and carve the inside away to allow for the glass to slide in.


 An exciting moment comes when I can view the glass behind the shape of the frame. With a rush I realize the piece is really coming together.
 An intimidating image - the box laid low.
 Painted black with black silk velvet about to line the interior.
 Now the bottom edge of the box is carved to inset the candelabra.

 This brass plate has been etched and will drop into the inside bottom panel of the box for some extra stability.
 After making a bolt out of one of the clover ends of the candelabra, I can thread it through to see if it will do the trick. All set here.
 Another big moment - attaching the side pulley structures. As soon as these are on I have the bare bones of the machine assembled - it will stand on its own now.
 I spend a good amount of time with it at this stage, trying to see what else should be addressed before going much further. The box interior now gets lined with beautiful velvet. I can't find proper silk velvet after looking at several shops (only synthetic), so I come home and cut the corner out of my dear and valuable 22-year-old old piece of backdrop velvet for my photographing. Painful but necessary.

Time to get the brass frame finished and mounted to the box.
 Piercing square holes into the corners, to inlay four beautiful cut Czech crystal cubes.
 These are joined by some very old brass floral elements that I just acquired on my last US trip.
 The back, painted and polished to let the glass slide easily.
 This is how it will read when it's finished. I love the ornate framing.
 Fabricating a cross-brace so the uprights don't bend inwards with the strain of lifting the glass.
 Turning to making an assembly from which to suspend the glass, I choose these great old steel nut picks, which I'll saw apart and join in the middle so the ball ends face outward.
 Annealing them to allow for drilling.

 Here's a delicate moment - tapping threads into the holes to put in some set-screws. So delicate, in fact, that about one minute after this photo is snapped, something else snaps. So with the tap broken off deep in the nut pick, I chalk up a full day to a blind alley and look for a different hanging element. It doesn't take too long to come up with a Plan B.
 I've picked up this brass/steel turnbuckle over and over again through the years, but obviously it was waiting for it's time. I can see that this device will allow me the benefit of being able to adjust the arms in and out for the best width.
 The loops are sawn open and drilling starts for making set-screw areas.
 The brass piece in the center has been made more ornate. Note the tiny set-screws in place near the ends. These will be replaced later with bigger ones, as the screw heads prove too delicate.
 I finally un-tape the chain and allow it to spool out. I can hardly believe I'll see it in one piece so soon.
 Screwing the box back (now front, from here on!) into position.
 The clover-bolt attaches box to base and the machine, minus a few more bits, is together. Only about a day or two away from actually, dare I say, testing it.
Tune in next week for the final posting.
Keith
Welcome back!
 Now that I've squared away the pulley system, it's time to dive into really uncharted waters.
 A generous student from a workshop I taught in Sydney a little while back gifted me this little hand-made brass winding mechanism, which I have to assume is a fishing spool. The textural clack/purr of the ratchet mechanism feels and sounds so good that it sprang to mind as a model for my turn crank. It only turns in one direction, and the arched piece of spring steel at the bottom must be gently depressed to disengage it from the ratchet teeth and allow it to wind back the other way. Perfect for my glass panel, so it couldn't drop accidentally like a guillotine and destroy the piece.
The only trouble will be, um, to fabricate it.
 I study the object to really understand it, then do some internet research to find out more about these devices, learning along the way that this is called a 'ratchet and pawl' system. The pawl is, in this case, the little rocking steel piece with a screw in the middle, held in tension by the steel tongue - this stops the ratchet from unwinding.
 First to make the toothed gear.

 As it's not going to be resting against a flat surface like in my antique reel, it needs a shelf halfway down the teeth. A British coin from 1806 has the perfect circumference so it gets soldered into place.
 With all this sawing of thick brass, I'm getting lots of brass dust. Like the miser I am, nothing goes to waste - I'm collecting it to use inside future pieces. It looks like gold dust.
 I design the pawl (the release arm for the reel). Searching for a suitable thickness of steel, I spy the wrench that came with my Ikea kids' chest of drawers that we got today and anneal it so I can saw it.
 Mid-cutting.

 Ready.
 Forgot to photograph this object before I started working on it, but this nut came off of a 1950's clock pendulum, which I grooved, stepped and embellished to make it more elaborate.
 The axle with the gear consists of brass tubing. One of the things I'm being mindful of is that like any good machine, it needs to be able to be disassembled.
 A second British coin, this one from 1740. Now I've got two divided reels for each chain to wrap onto.
 The fancy nut with the brass rod screwed in. This is what will pass through the gear/tubing to attach it to the structure.
 Decorating the other nut to go in back of the piece. I need to make it adjustable and stable, so I decide to drill and tap it so I can make a tiny set screw to hold it in place.

 This is already more 'machining' than I've ever done. Little do I know what's left to do.
Now I can assemble these elements and see how they fit. Though I'm still a long way off from being able to test this thing out - I still have no idea whether it's going to work at all. It helps to be an optimist.

 Looks good at this stage. Now to adapt the candelabra to hold this crank. I'll begin by running a tube through the base and riveting it front and back.

 Done.
Done.
 The chains get soldered onto the shaft, then wrapped and taped up to keep them out of the way for the time being.
 As it was made up until now, there is nothing to make the tubing turn with the crank, so tiny tabs are soldered onto the back of the crank wheel where it meets the tubing. I will then slot the end of the tubing to catch the tabs, as shown.

 On now to attaching the pawl to the base. Because I don't know how far out the toothed gear will sit from the candelabra (it has that deep decoration, plus it's not straight up and down), I need to make an adjustable post that will hold the spring in place that tugs on the pawl, keeping its tension. So on to that. Here the wire has been twisted to harden and is drilled in the end.
 Using a threading die.
 Adjusting the rod.


 Etching a date/signature into the back of the base.

Now all of my quiet excuses have run out to dodge the thing that has been making me most nervous during the whole project: dismantling the beautiful box. I'm a bit petrified it will get decimated and then won't be right for whatever reason. Well, I'm in this deep, there ain't no going back. Call in the demolition squad.
Note - I'm leaving at week's end to teach up in Rockhampton, Queensland for a week. I think internet is a bit sketchy at the venue, so I can't promise the fourth and final stage next week - it might have to be the following week. Either way, we're almost there!
Cheers,
Keith

 Sawing the end pieces off...
 ...and replacing them with more curved tubing.
 The time is here at last. I trace the line of the frame to be cut away in the back of the box.
 'Round these parts, we call this: Voiding The Warranty.
 Only a very deep saw frame will cut a panel this large. This jeweler's saw has a 10" throat.
 Pierced. Now to finish the edges and carve the inside away to allow for the glass to slide in.

 An exciting moment comes when I can view the glass behind the shape of the frame. With a rush I realize the piece is really coming together.
 An intimidating image - the box laid low.
 Painted black with black silk velvet about to line the interior.
 Now the bottom edge of the box is carved to inset the candelabra.
 This brass plate has been etched and will drop into the inside bottom panel of the box for some extra stability.
 After making a bolt out of one of the clover ends of the candelabra, I can thread it through to see if it will do the trick. All set here.
 Another big moment - attaching the side pulley structures. As soon as these are on I have the bare bones of the machine assembled - it will stand on its own now.
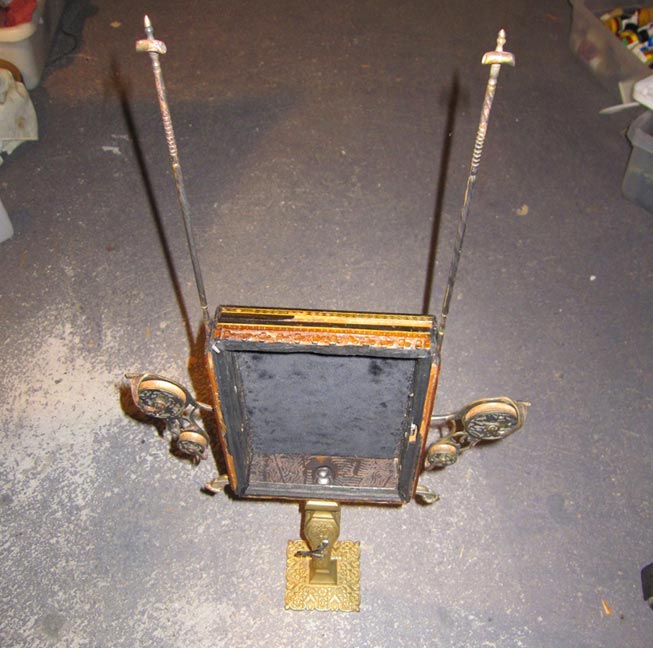 I spend a good amount of time with it at this stage, trying to see what else should be addressed before going much further. The box interior now gets lined with beautiful velvet. I can't find proper silk velvet after looking at several shops (only synthetic), so I come home and cut the corner out of my dear and valuable 22-year-old old piece of backdrop velvet for my photographing. Painful but necessary.
 Piercing square holes into the corners, to inlay four beautiful cut Czech crystal cubes.
 These are joined by some very old brass floral elements that I just acquired on my last US trip.
 The back, painted and polished to let the glass slide easily.
 This is how it will read when it's finished. I love the ornate framing.
 Fabricating a cross-brace so the uprights don't bend inwards with the strain of lifting the glass.
 Turning to making an assembly from which to suspend the glass, I choose these great old steel nut picks, which I'll saw apart and join in the middle so the ball ends face outward.
 Annealing them to allow for drilling.
 Here's a delicate moment - tapping threads into the holes to put in some set-screws. So delicate, in fact, that about one minute after this photo is snapped, something else snaps. So with the tap broken off deep in the nut pick, I chalk up a full day to a blind alley and look for a different hanging element. It doesn't take too long to come up with a Plan B.
 I've picked up this brass/steel turnbuckle over and over again through the years, but obviously it was waiting for it's time. I can see that this device will allow me the benefit of being able to adjust the arms in and out for the best width.
 The loops are sawn open and drilling starts for making set-screw areas.
 The brass piece in the center has been made more ornate. Note the tiny set-screws in place near the ends. These will be replaced later with bigger ones, as the screw heads prove too delicate.
 I finally un-tape the chain and allow it to spool out. I can hardly believe I'll see it in one piece so soon.
 Screwing the box back (now front, from here on!) into position.
 The clover-bolt attaches box to base and the machine, minus a few more bits, is together. Only about a day or two away from actually, dare I say, testing it.


 Posts
Posts


