
I've been back in the studio working on another piece I'd like to share with you. At the time of this writing I'm not positive about the title being used (I'm still working on the piece), but I'll go with it assuming it's going to stay.
The first instigative element for this piece is a spigot handle - I've used many of these to pleasing effect, and I'm all for exploring the form further. Two of the neckpieces I've made with them are among my favorites, but I'll try not to let that weigh on my mind as I work, lest it influence the process.

This is the orientation I've been viewing as the front (though my plan is to make it rotate, leaving either side in front).

I love the receptacle around the perimeter, and plan to use that.

First job is to remove the middle structure, which makes the spigot very heavy.

Now it's about 1/3 the weight.

The spigot will rotate nestled in the jaw of an animal trap.

Free at last. No animals were harmed in the making of this artwork.

An earlier piece I made, The Pearl That Worldlings Covet, employs the trap jaw UNDER the spigot, making the attachment more of a challenge. I'm going with it.

Into the tumbler goes the trap jaw. It'll take at least 24 hours.

Meanwhile, using a copy of the spigot on paper, I begin to design a metal plate that will both embrace the spigot and create a rotational mechanism for the piece to move.


As the drawing comes together, I decide to have a bust etched onto the plate in the center. I need to pick this out now, as it will dictate how to pierce out the interior of the metal.

At a recent etching workshop I was giving (yo, Ginny!), I managed to create my best etched image yet - this prompts me to use another daguerreotype image to be etched onto the plate. I can already tell it'll be the most demanding etching job I'll try. The older man in the right window is my subject.

His silhouette now becomes the focal design in the center of the plate. I like the asymmetry of this.

Oh yeah - now the plate must be cut. This is a thinner gauge brass than I've been using in my previous pieces, so it moves pretty quickly.


Cutting finished.

Checking the fit...

Looks good so far. Now to finish the edges of the plate and polish it.

Ready now to get the face etched on.

Although this PnP Blue etching paper has its drawbacks, it is wonderful to use in this fashion.

Registering the image to the plate.

And transfer complete...now to etch.

I decide, after some hesitation, to use ferric chloride as my etchant, rather than the saltwater etch I've been using of late. This is because I will have more precise control over the depth of etch this way. I'm also etching imagery on the back of the plate as well, so it needs to be suspended in solution.

In the oven, so to speak.

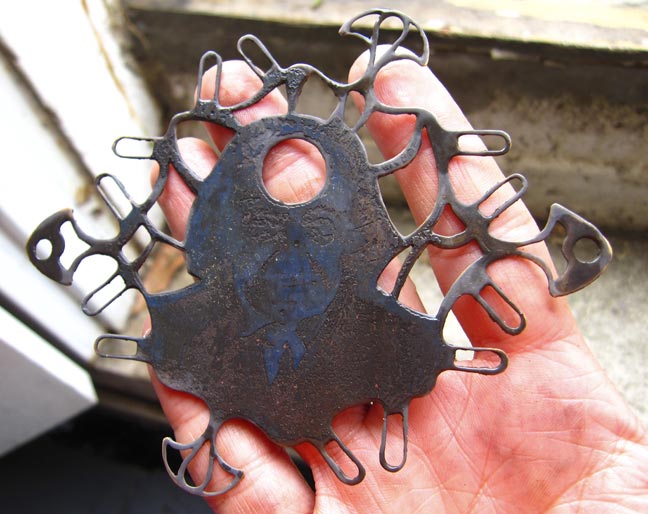

The plate finished and ready - cleaned, patinated and partially shaped - ready to lay aside for later.
In the next part, I'll flip this over and start to realize the other vantage point, as well as consider the trap jaw - and really, shouldn't we all, when it comes down to it?
Take care till next time.
Keith


 Posts
Posts


